There are four different kinds of static routes:
- “regular” static routes
- Host static route (“host routes”)
- Floating static routes )floating on what?)
- Default static routes
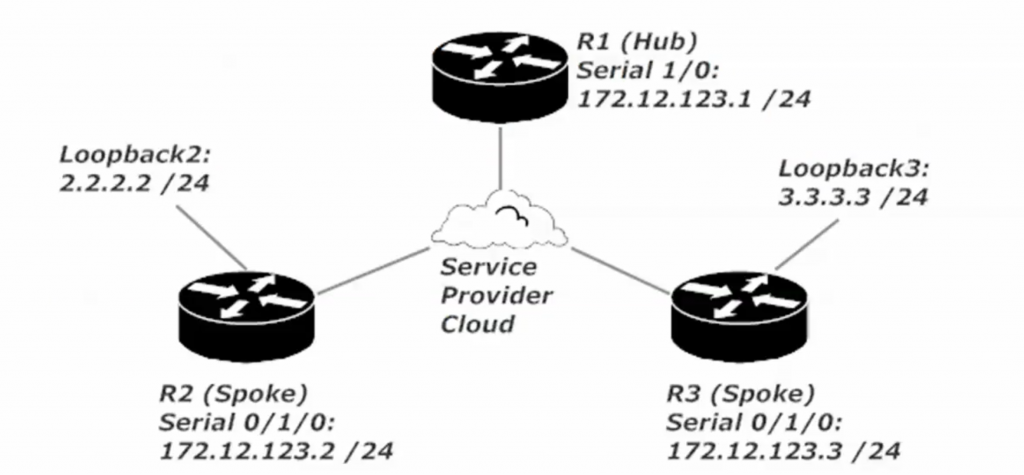
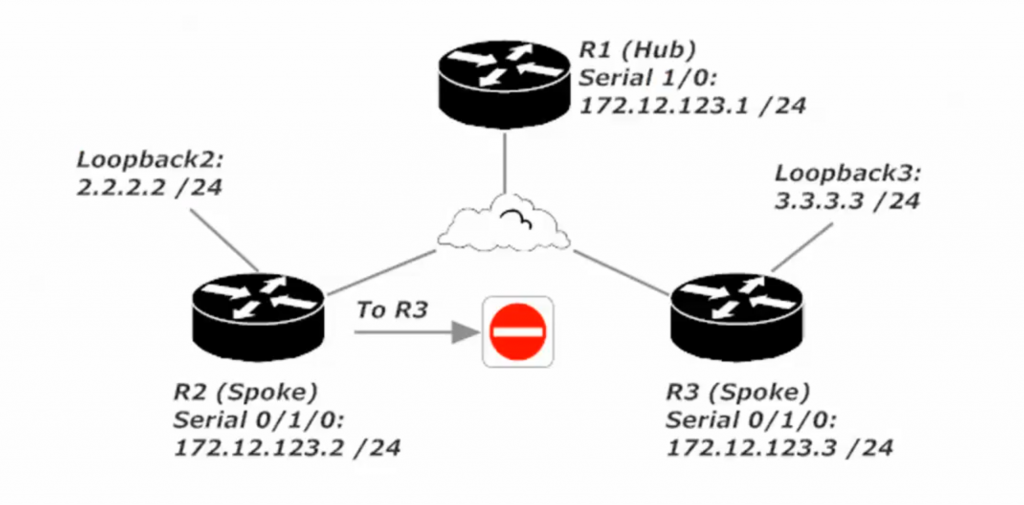
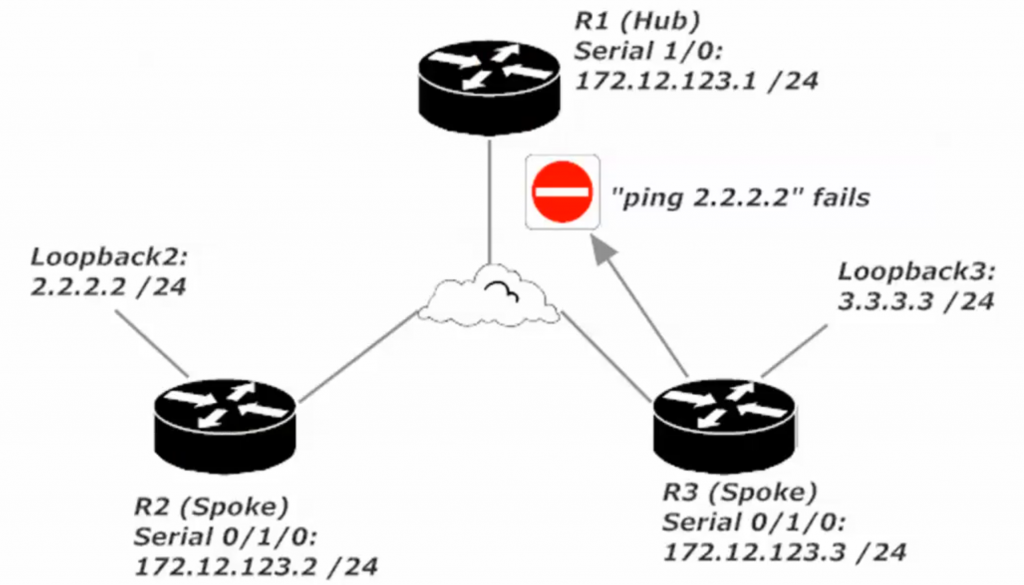
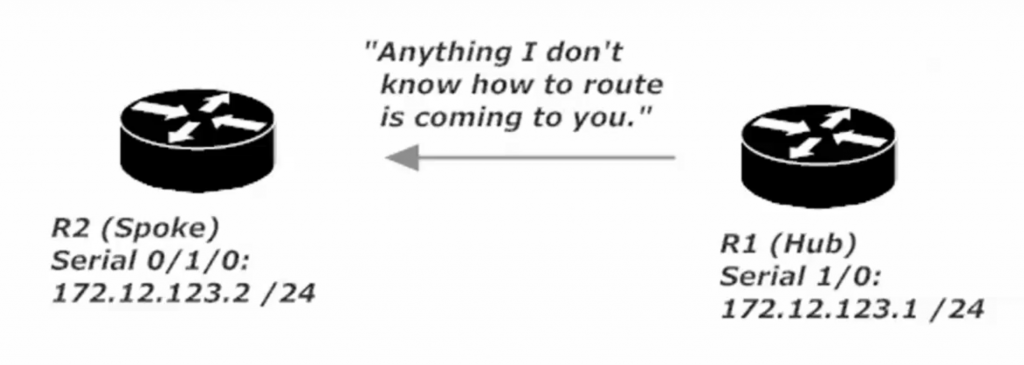
This is the network we’re going to use
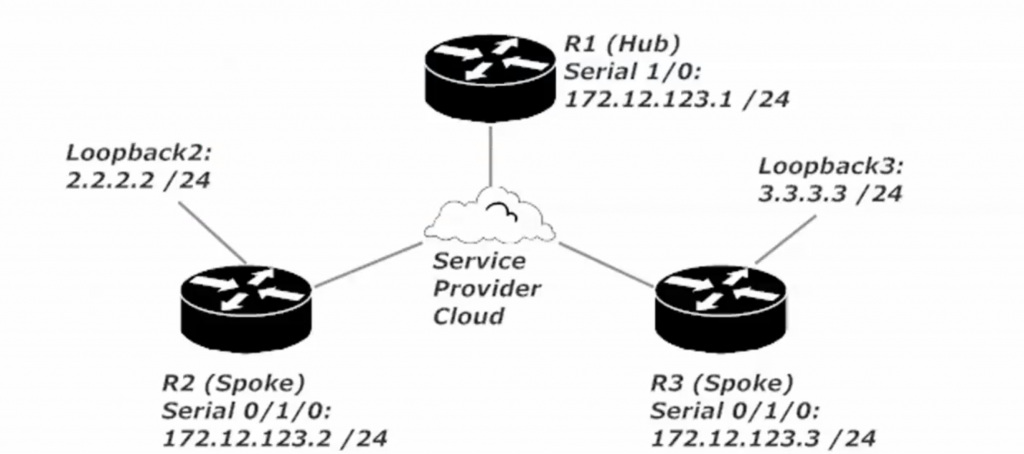
R1 is our hub router, and the IP addresses that are on the serial interface of all three routers belong to the 172.12.123.0 /24 network, and as always in our labs, I use the router number as the last octet.
We’ve got a couple of loopbacks here on R2 and R3.
What’s going on with these loopbacks?
The loopback interfaces are logical interfaces. They’re not shown connection to a switch, router, or host simply because they don’t connect to anything.
During our Cisco studies, you’ll learn quite a few uses for loopback interfaces, but for our labs they serve one main purpose – to give us more networks to work with! ( we’re not limited to the number of serial or physical interfaces that we have on the router. If I want 20 networks to work with in a lab, I can create 20 loopbacks. The router doesn’t care, and they’re treated by a routing protocol or by static routes as if they were a physical interface.)
Configuring a loopback is simple…
I’ve already configured all of those interfaces but I want to show you how to configure loopback and it’s very simple.
I want to call one loopback 11 :
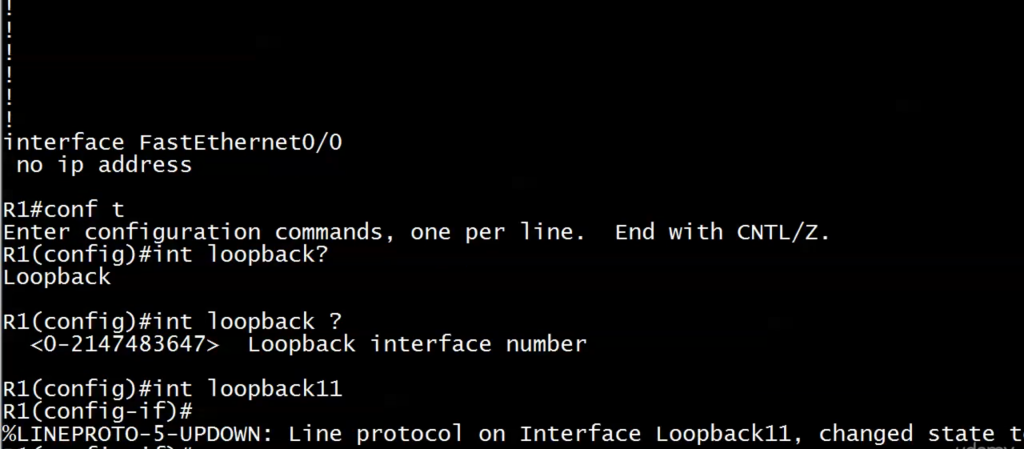
Now I want to give it IP address.
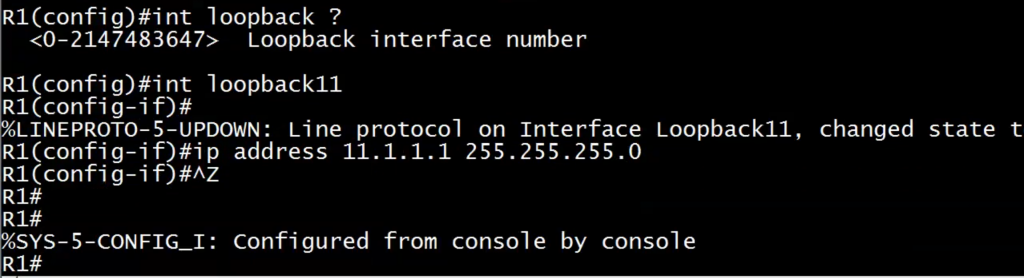
You’ll get a message there : ‘Line protocol on Interface Loopback11’
We didn’t get a message about the physical state of the interface because there is really no physical state.
When I do a ‘show interface’ here on the loopback, it will show something in the physical spot.
What we’re concerned about is just the ‘line protocol’ coming up. But with a loopback you really shouldn’t have any problems with the line protocol. It should come up as soon as you name it.
So if I put ‘ip address 11.1.1.1 255.255.255.0’ , that would be it.
Now I do ‘show int loopback11’
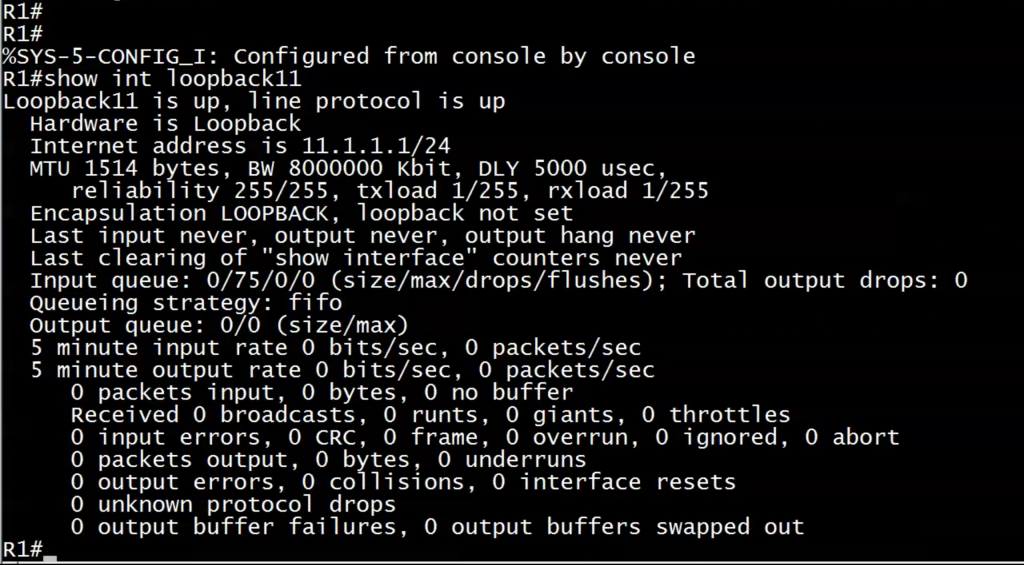
You’ll see that the top information looks a lot like the other ones that we’ve seen so far with this command. You’ll see ‘loopback 11 is up’ so we know that’s usually the physical state of the interface. ‘line protocol is up’ . ‘hardware is Loopback’ so there’s a clue.
Do you remember that IP address that’s reserved for loopbacks? (127.0.0.0)
So if I try to give this address or an address from that range, you’re going to get ‘not a valid host address’
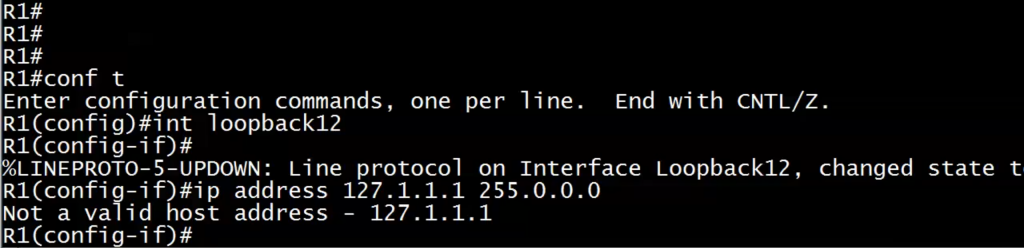
This is a reminder that even though that entire range is reserved for loopback interfaces, it doesn’t mean Cisco router loopback interfaces ! So you still have to give the interface (your loopback interfaces on a Cisco router) a routable address.
So the router’s going to be kind enough to say “Hey it’s not a valid host address” but exam will not be as kind!!
Now I want to take these loopbacks off because it’s just as important to know how to take them off as it is to put them on. So now I’ve got loopbacks 11 and 12. They aren’t really involved in my lab, and I want to take them off now before I get started, and all I would need to do is put a NO in front of these.
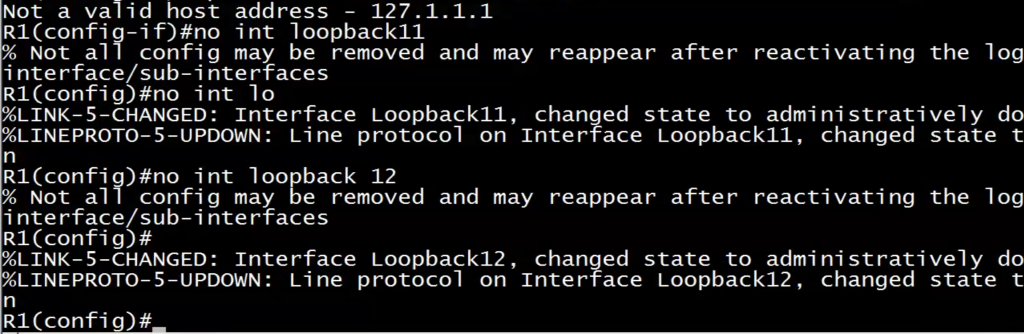
Now you see a very unusual message and it’s the only place you’ll ever see this: ‘Not all config may be removed and may reappear after reactivating the logical interface/sub-interfaces’
It sounds like this router is haunted!! Well it’s really not. But this can be a frustrating thing because what’ll happen is you take a loopback off and when you want to put it back on, it’s going to call up its old IP address( the one it had a minute ago). It doesn’t happen every single time though! But it does happen!
So what I suggest is : The only way get rid of them is to remove them like this, or do a ‘write erase’ and reload the router, and when you reload the router, that clears the old information. ( will not be in exam )
Now let’s go ahead and send a couple of pings around.
What we want to do is pinging R2 and R3 on their serial interfaces so it’s 123.2 and 123.3 and this is a good thing to do before a lab anyway.(checking our connections before we start) because then if something goes wrong in the lab and maybe I’m troubleshooting the wrong thing if I had an IP address wrong or something…
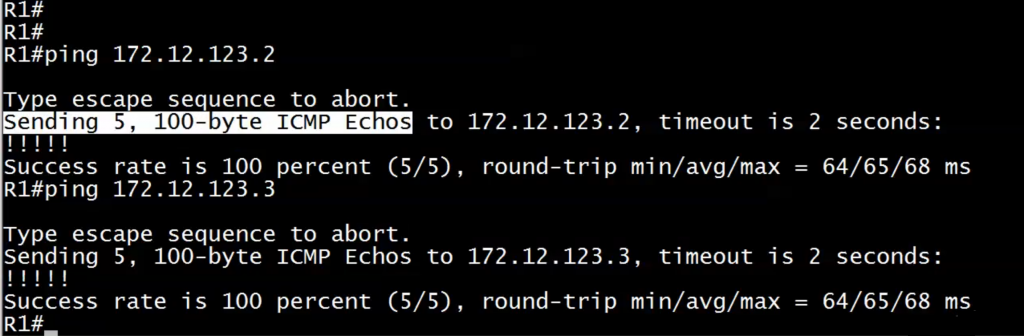
We’ve got 5 exclamation points! That’s exactly what we want because as you can see, we are sending 5 , 100byte ICMP Echo packets.
So we sent the pings. They came right back. But how did they do that? We haven’t configured any routing protocol or any static routes or anything!
Intro to Debug IP packet
Let’s take a look at the routing table on R1 that will definitely give us a clue.
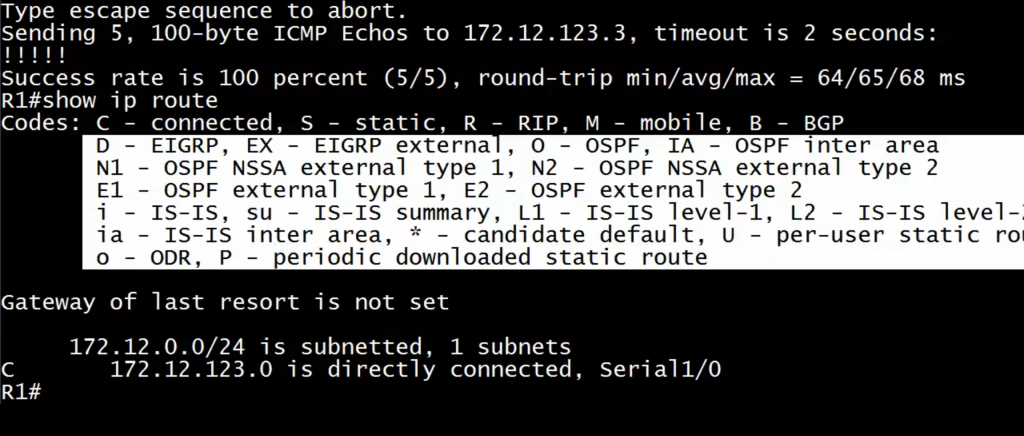
Don’t worry about the highlighted area!
Right now we are only concerned about connected routes ( C – connected ) and that’s the only kind of route we have here on R1. It’s a connected route. But when R1 wants to send packets to addresses on the 172.12.123.0/24 network, it’s directly connected and it’s ready to go. So R1 has no trouble pinging R2 and R3 on that same subnet. Because they’re all connected to it so we’re all good there.
Now a quick note about our network before we send some pings, and our service provider cloud. This is ‘frame really’ that I use in our rack, and your actual production lab probably uses something different. (frame really is not a topic on the CCNA anymore!)
We’re just simulating a wide area network basically. So we’ve got R1, R2 and R3 to work with. This is very much like a lot of networks out there in production because what you’ll have is like a headquarters and you’ll have your hub routers there and in different cities and different physical locations you’ll have your spokes. So that’s what we’re mimicking here.
Now let’s go over to R2, and I’m quite sure that we can ping 172.12.123.1 and 172.12.123.3 from there.
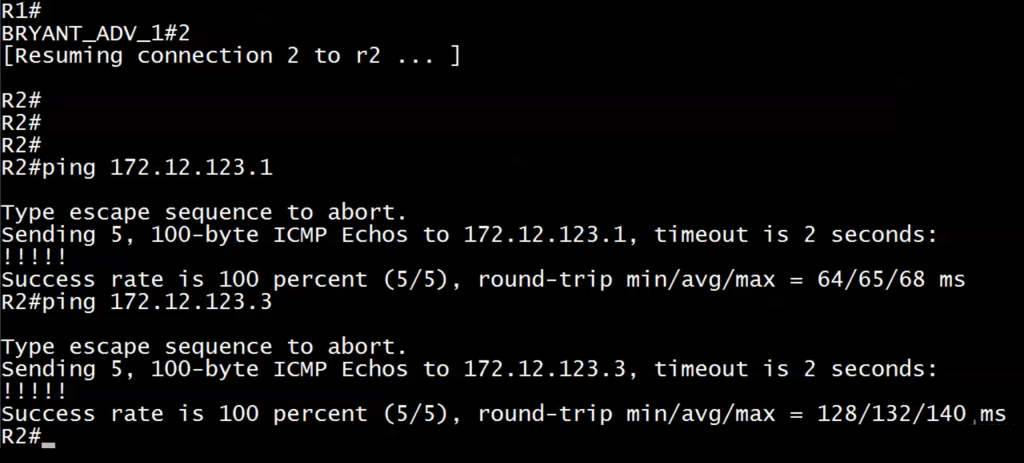
This time, those exclamation points didn’t come back quite as fast.
Let’s look at these round trip times. We usually don’t look at this a lot with pings unless we’re doing some really advanced troubleshooting but notice here , min/avg/max in the first one, and it took about 65ms to get the job done with that ping. The other one took twice as long and the only reason I’m showing this to you is to impress something upon you that I’m going to hit you over the head with a couple of times. Because it takes a little getting used to but it’s a very important concept when it comes to a hub and spoke routing.
Here’s the deal:
We’ll run most of our labs on this hub-and-spoke network, with R1 serving as the hub and R2 and R3 as the spokes. This is a common real-world network topology, so I want you to see it in action as often as possible in this course.
Traffic that goes from one spoke to the next does not go directly from spoke to spoke.
When I sent those pings from R2 to R3, it didn’t go through that cloud and go straight to R3.
Hub and Spoke traffic and Spoke to Spoke Traffic always goes through the hub. That’s why it took a little longer for R2 to ping R3 twice as long as it did for R2 to ping R1 because the pings that left R2, went up too R1 then backed out R1 to R3 and then when the echoes were being returned they went from R3 to R1 and then R1 to R2.
So here’s actually what happend there:
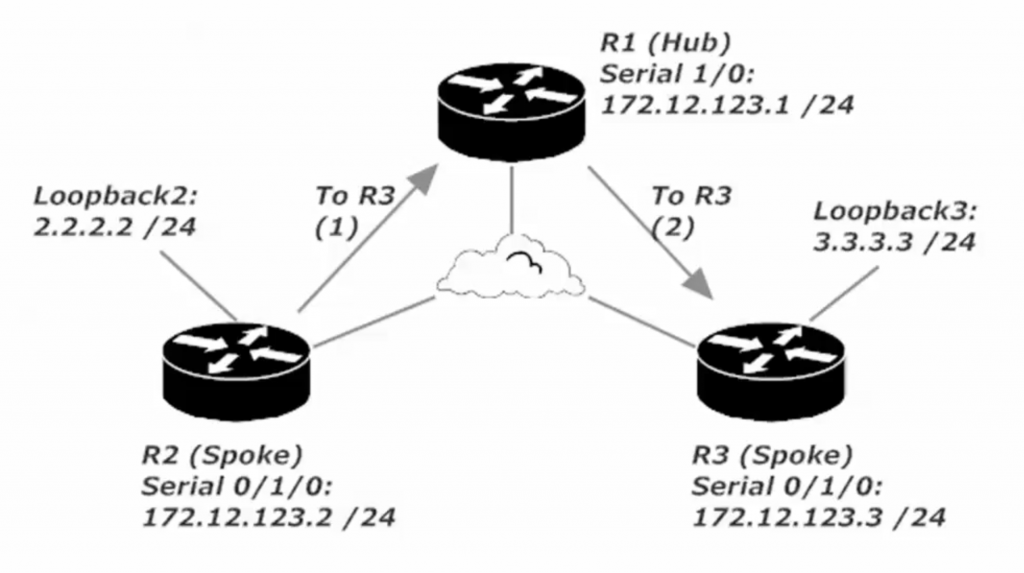
It’s a two step process in this situation with two spokes and one hub for R2 to send packets to R3. Everything’s going to go through the hub, which is why in real world and in a lab you really want more powerful router to be your hub router. There is no reason to spend money on a brand new router for some of these spoke locations because they didn’t handle much traffic.
Loopback Pinging
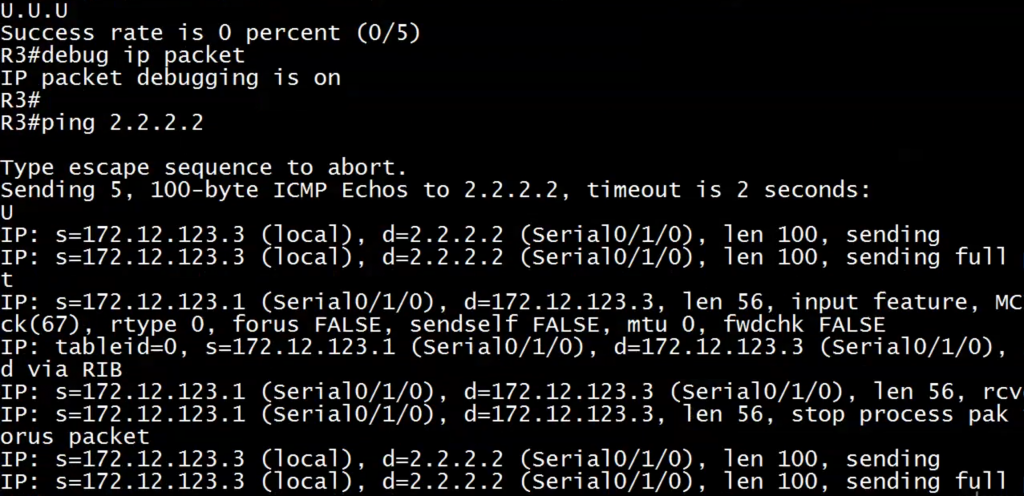
Let’s go to R3 and send some pings to 2.2.2.2 and see what happens.

0/5 is not good!
Why could R3 ping 172.12.123.2 on R2 but could not ping 2.2.2.2 on the exact same router?
Where is the problem?
It’s easy to assume that the problem is always on the local router and a lot of times it is!
But it could be a problem on a downstream router.
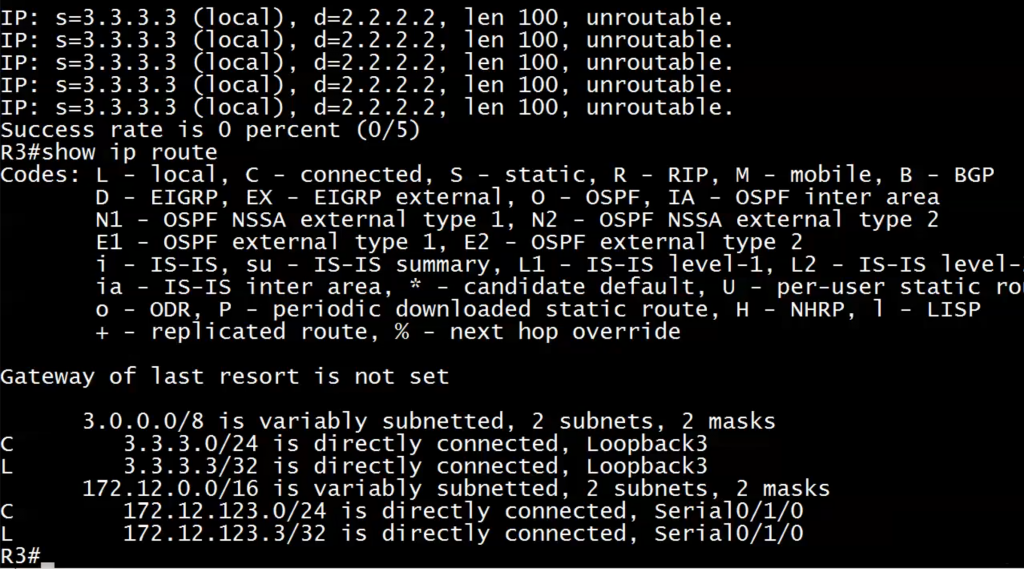
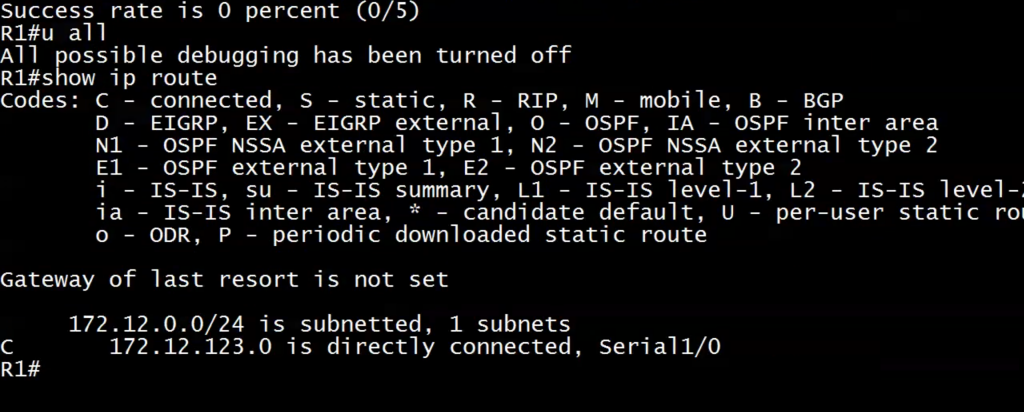
Let’s do a ‘show ip route’
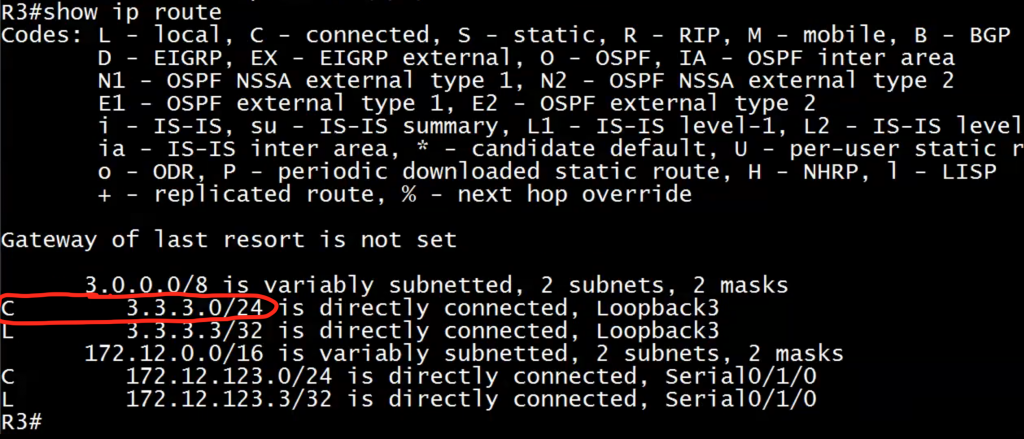
As you see, this router is going to show you some local routes (we’ll go over it later)
For now, we’ll just concentrate on connected entries.
Now let’s do a ‘show ip route connected’
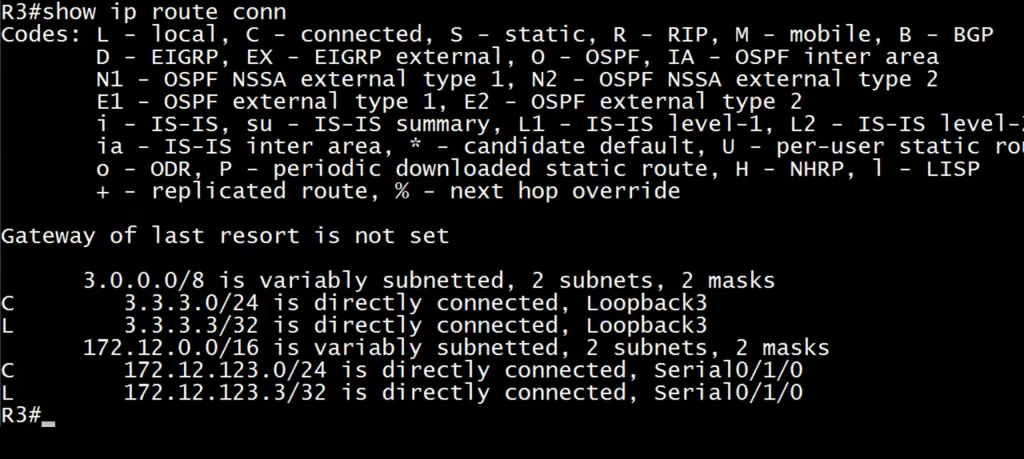
This router is looking to route packets to 2.2.2.2 and it’s going to look in this IP routing table that we looked at first (the full table at the previous picture) and it’s looking for the best match, and we don’t have any kind of match because we don’t see anything in there that even begins with the ‘2’ , so I want to introduce you to a de-bug!
Note: be careful with de-bugs! Because they can give you so much information that you can’t access the router! And also we want to run them when things are running well also. But right now the pings aren’t going through and it’s telling us there is a problem but it won’t tell us what the problem is.
That’s when we run ‘debug ip packet’ (very powerful debug) , and then we send a ping to an address that we know we can successfully ping because it’s really important to know what a debug looks like when something is working well. So you have something to compare it to when it’s not working well.

It’ll give us a lot of information
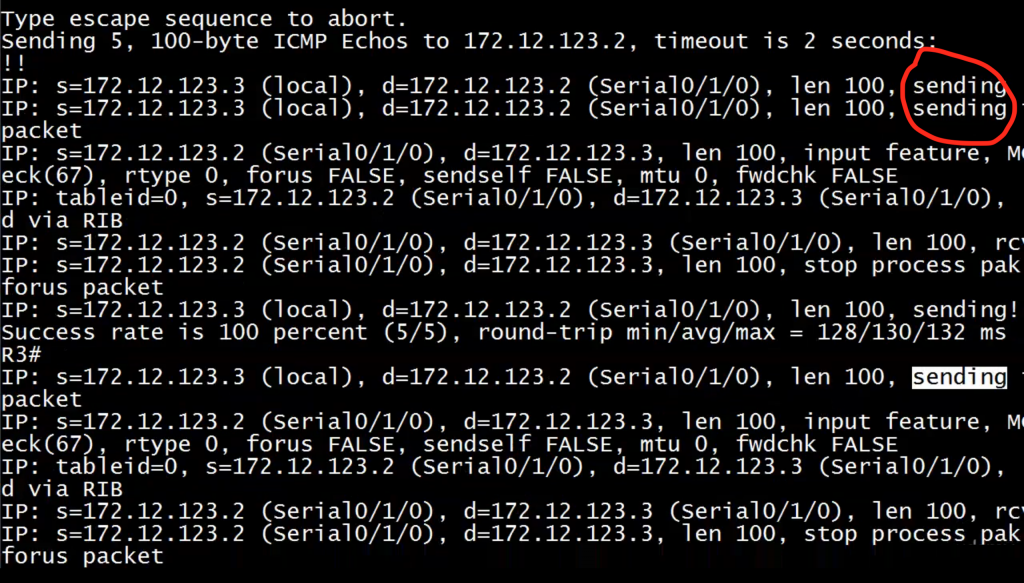

At the end, we’ll do a ‘u all’ (it’s a short form for un-debug)
You’ll see the word “false” a couple of times but that isn’t the issue here.
We’ve got the word “sending” and that’s the first thing we look for. This would be our ping that went through and what we’re looking for is that the packets are actually going out.
We’re always looking for the word “sending” and you see that ‘!’ there. That’s just one of the pings that came back. It’s going to get mixed up when you have a debug.
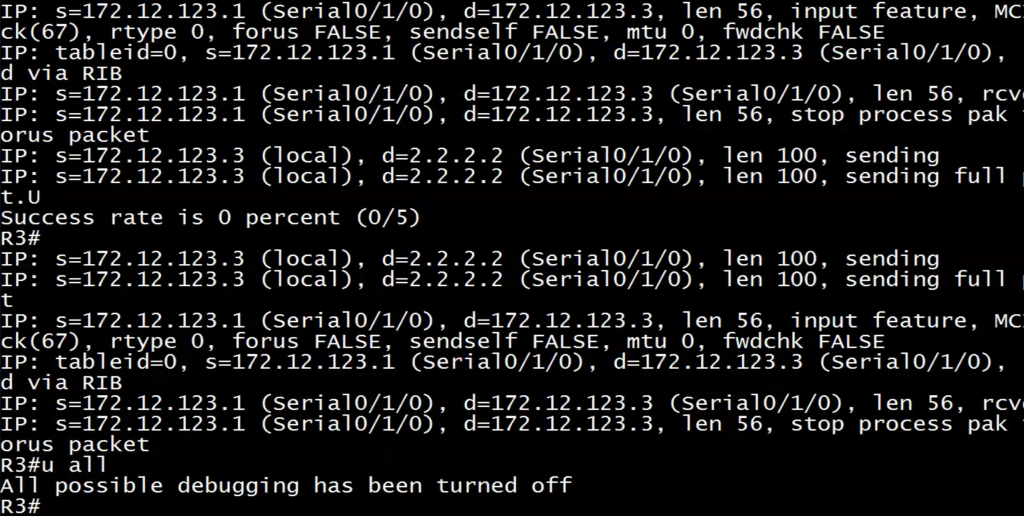
Now I’m going to turn debug back on and ping 2.2.2.2 and see if we can spot what the issue is.
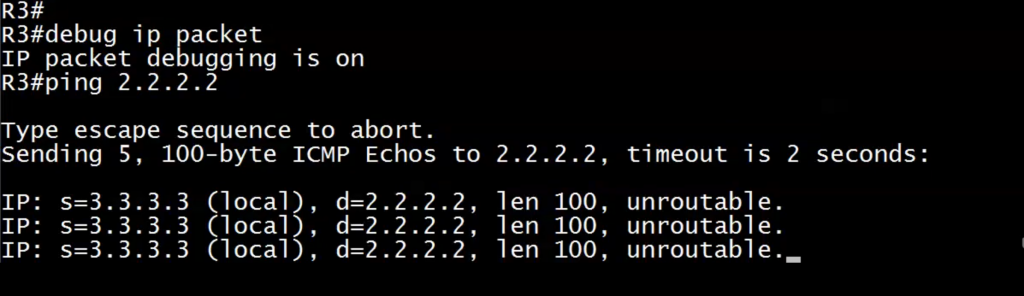
That does not look good!
The word “unroutable” in a return of a debug is always bad.
This doesn’t mean that the packet was corrupted. It just simply means that these packets aren’t even leaving the router. We’re not seeing the word “sending” this time like we did with the good ping and the debug. Because R3 is looking in its routing table and saying :”hey I don’t have a route here that matches 2.2.2.2
And on top of that, there is no default gateway set on this router.
Host Static Routing
So what we have to do first after doing ‘u all’ ?
We’re going to use a different kind of route this time ( Host Static Route or Static Host Route)
We’re going to write a static route that matches one and only one address and it’s going to be 2.2.2.2
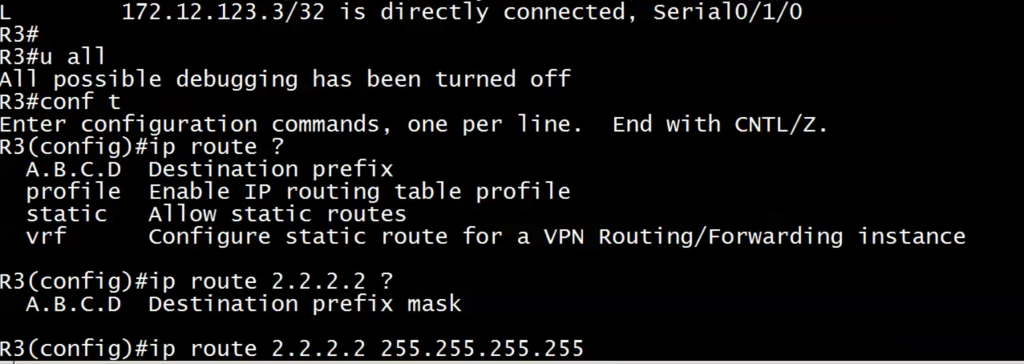
We start with ‘ip route’ command, and we’ll stick with destination prefix here and leave those other three options for later.
Then I’ll match it exactly to that one ip address.
Then I’ll be asked for “destination prefix mask” and for my prefix mask here, I want all 1s because I want to match that IP address exactly. So it will be 255.255.255.255
We’re not done yet but we’re real close.
I have two choices here for my last value. ( THIS IS VERY IMPORTANT FOR THE EXAM )
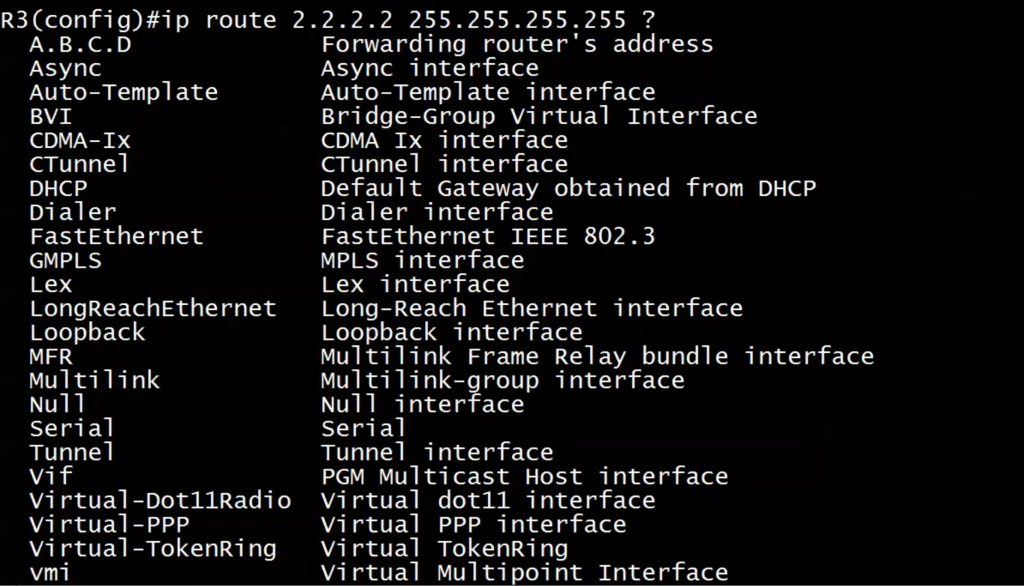
You either have to put the IP address of the next hop router the interface is going to receive the packet after we send it, or the local router’s exit interface.
Very important distinction there. You’re either setting the downstream router’s IP address that should receive this packet -the next hop IP address- , or you are going to enter the local router’s exit interface.
So here I’ll send it to the next hop IP address. Now you might say :”Which one should I use in different situations?”
Neither one is necessarily better than the other. In more complex networking, it’s better to put the next hop IP address because that way you know exactly where R3 is sending these packets, and if you’re still running into an issue it makes it easier to troubleshoot that issue especially in a larger network because if I put the interface here ( serial 0/1/0 ) the command would work because I’m putting the local router’s exit interface, but instead of being more determinative about where I’m sending the packets, I’m just saying: ”Hey ! Chuck them out this interface and let’s hope the downstream router knows how to handle.”
Now what’s going to happen then on a live router if I put the local router’s IP address here?
I know I need to put what ? what address should I put here?

The next hop IP address is 172.12.123.1 . It’s not .2 because we know that this traffic leaving R3 going over to R2 has got to go through R1. So the next hop IP address for this traffic as it leaves R3, the downstream interface that we want to receive it is actually 172.12.123.1
Now if I put 172.12.123.3 which is the local router’s IP address, it’s going to say: “ Invalid next hop IP address!”

So the router is kind enough to tell you that. The exam will NOT !
So if you see an IP address at the end of this command, it has to be the downstream router’s IP address (your next hop IP address). If you specify an interface here whether physical or logical, it’s an interface on the local router.

That’s all I’m required to put, and I’ve got the next hop IP address there and we are good to go.
Let’s see how that looks in the routing table.
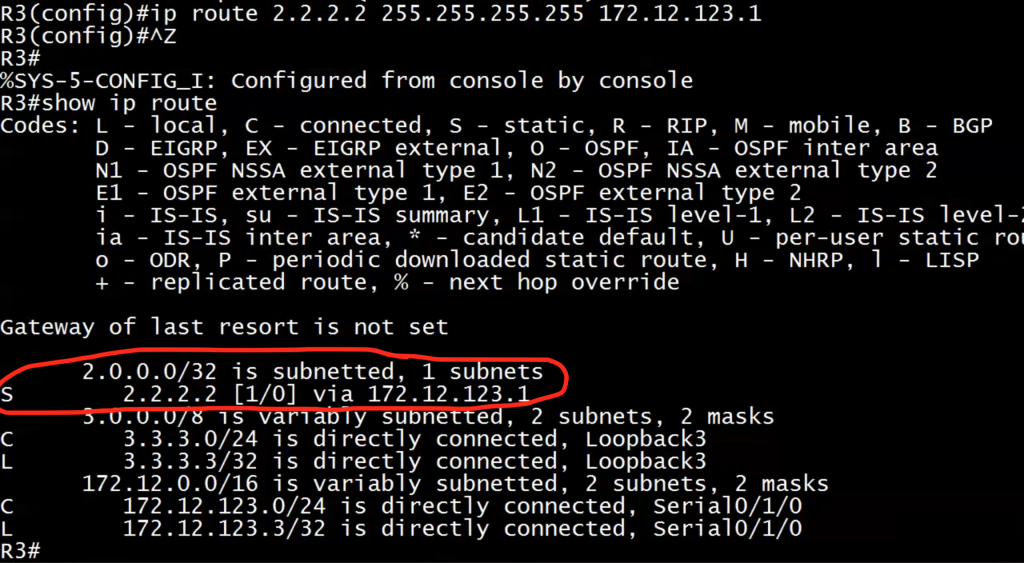
As you see, we have a new route.(will explain it later)
Right now I’m just concerned about getting this connectivity setup.
Note: it has letter S next to it and as you would expect that stands for “static”
Let’s see if we can ping 2.2.2.2 now.
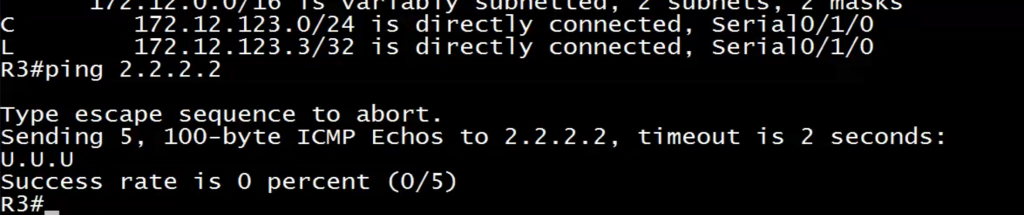
Ugly result!
A ‘U’ and a time out and then ‘U’ and then a time out and then another ‘U’
The only thing that’s good about this is that it’s a really great indicator of where the issue is!
Note that we’re not seeing what we saw before with five time outs.
Let’s see what happens with the debug and then we’ll send the ping again.
Another thing with debugs here that I want to mention is that either in a production network or in a lab or in a practice exam or on the real thing, you‘re going to see debug output sooner or later that you haven’t seen before and you may panic! But don’t!
If you start at the top here you can say : “ ok we’ve got some packets leaving 123.3 and that’s local, and there’s D for destination for 2.2.2.2 and they’re going out this time (sending)
Now the failed ping for that same network that we saw before, those packets weren’t going out! They just said unrouteable five times and that was it.
We are also getting a reply because as you notice, we have some other rows here that says “source 172.12.123.1” and the destination is 123.3 so it looks like the packets are leaving R3 and they are destined for 2.2.2.2 and they are leaving. We see the word “sending” and also we’re getting something back from 123.1. what are we getting back there?
everything else looks pretty much the same but we just know at this point even with this hints that the packets aren’t going through.
Default Static Routing
You can’t just concentrate on one device. You have to look at entire picture as a world class network admin.
Here’s where we are right now and we know the ping to 2.2.2.2 is failing from R3, but the thing is it’s not enough for R3 to have a route to that network. Because it does! And the pings still aren’t going through. The downstream router ( in this case R1) also has to have a path. Because right now if R1 goes up and pings 2.2.2.2 , nothing is going to happen, and we can go right up there and see that in action.
Let’s do a debug first and then send a ping:
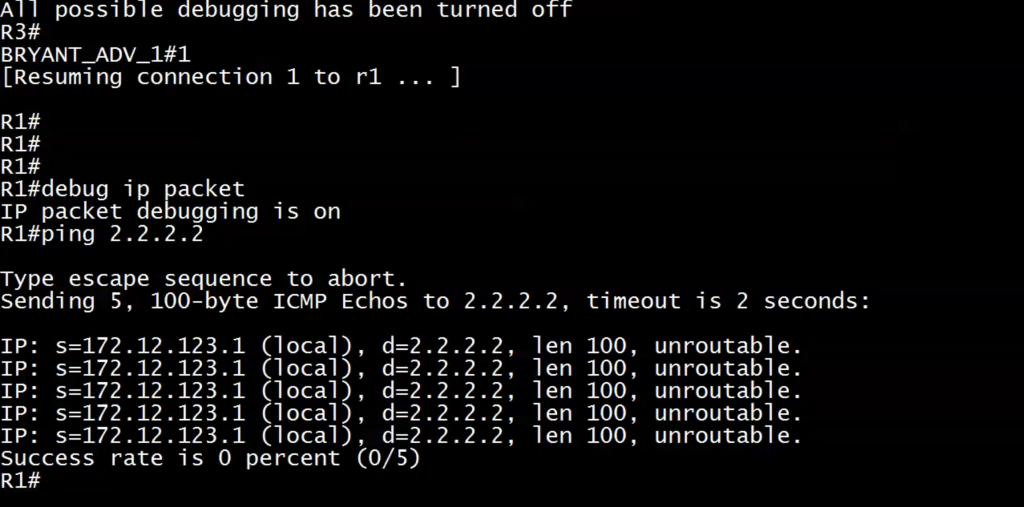
We get the exact same thing we had on R3 previously (unrouteable messages);
This is the good thing about the debug. It gives you some great information especially in a lab and a practice exam environment and it tells you exactly what’s going on with the packet. Because with the pings, we send those, and it’s a great first test. But we don’t get anything after that! Are they leaving the router? Ping doesn’t tell you… Are they unrouteable downstream? Ping doesn’t tell you…
That debug IP packet really helps to give you this information.
Now we got to have a way for R1 to get packets to 2.2.2.2 and ordinarily I would write a host default route and the situation is well.
So what I’m actually going to do is write a default static route, show you the syntax for that, and show you what it looks like in the table.
Let me do a quick ‘show ip route’ here again.
You can see still the only route we have is a connected route.
So I’m going to write the default static route here and this is the kind of syntax you have to get over this when you first start studying Cisco technologies. But some of the commands just look funny!
When you’re configuring a default static route, you’re still going to use the ‘ip route’ command for a host default, a regular static or static default like we’re doing here, and you’re also going to use it for floating static route.(later).
It’s just for our default static route. This is going to look a lot different.
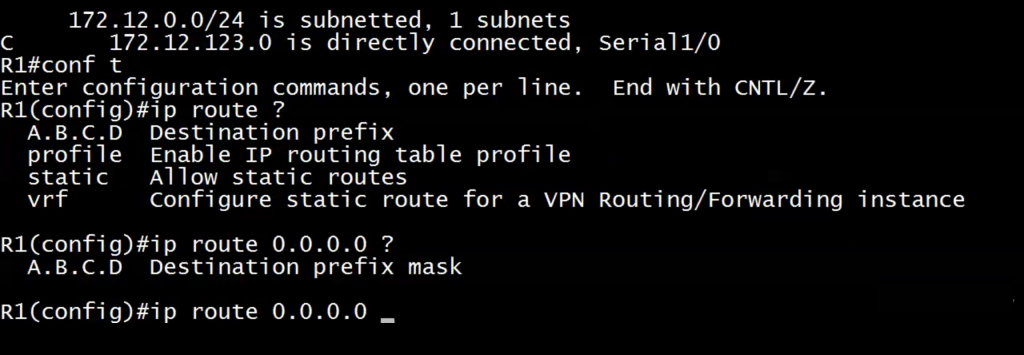
The destination prefix is all zeros and then so is the mask.
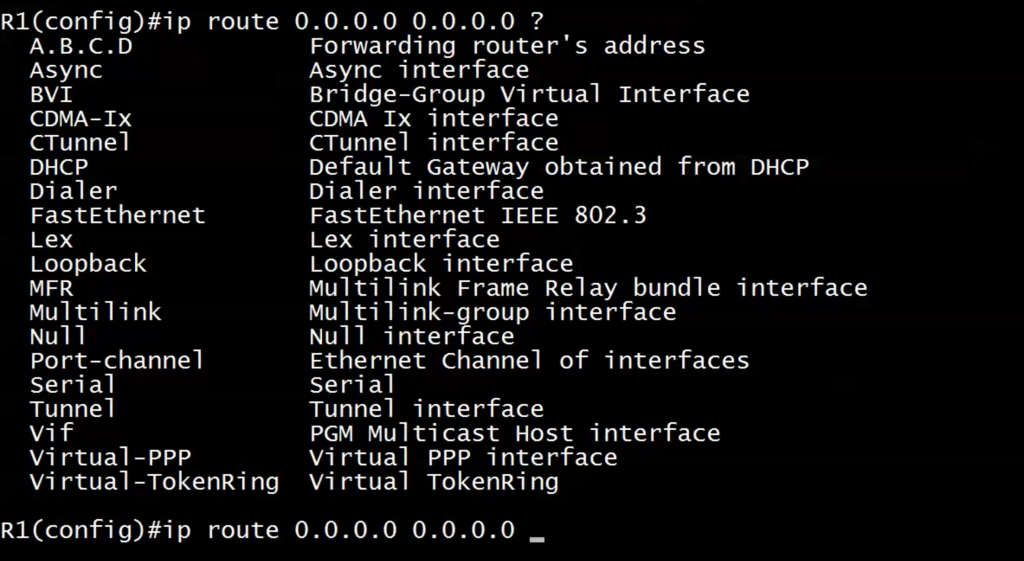
And you still have to end it with either the local exit interface or the next hop IP address.
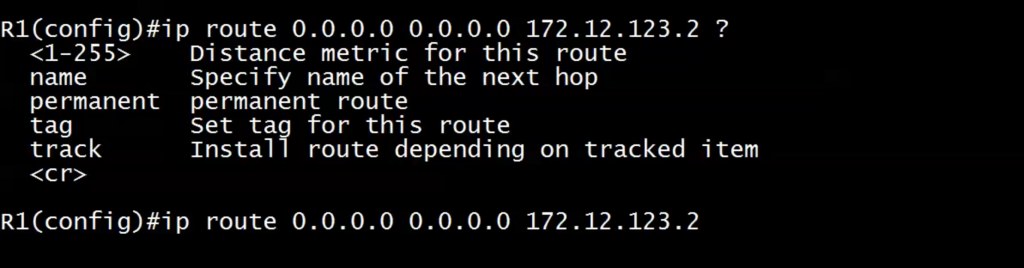
We have some options here we’ll se in later studies.
When you see that ‘ <cr> ‘ down here, it stands for “carriage return” which is a fancy way of saying “Enter” and that is to indicate to you that what you have in here is a legal command and when I use ios help to see the interface types and see the options at that point, if you don’t see a <cr> at the end ( like the upper part of the picture ) it means it’s not a legal command yet (without ip route in this case), but with ip route we do have a legal command.
So I’ll go ahead and hit ‘carriage return’ and hit ‘enter’
And let’s see what the routing table looks like now.
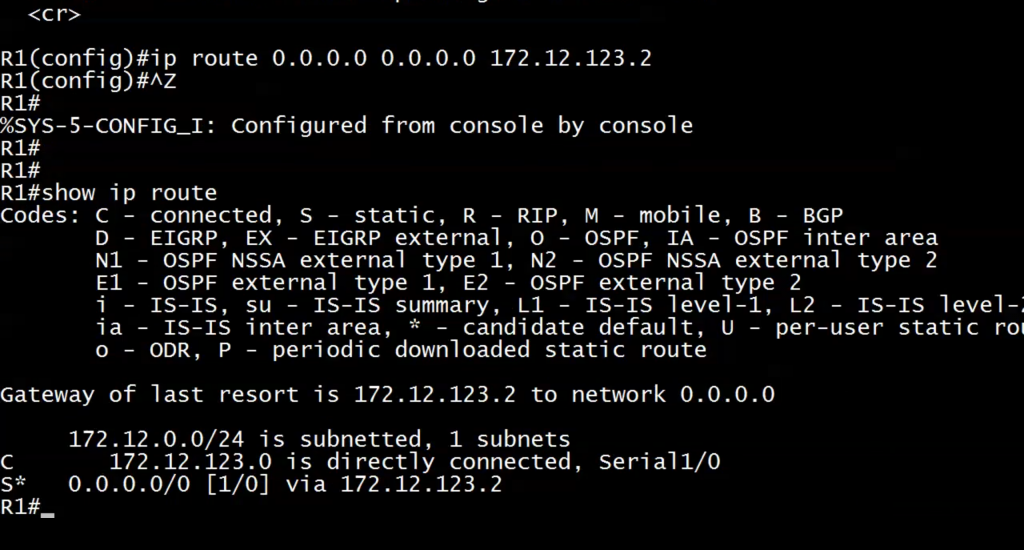
Big difference here! And we don’t have an ‘S’ ! We have “S*’
Anytime you see that little asterisk over there whether it’s next to an ”s” or next to another letter, that is a “candidate default route”, and if it’s the only candidate default route you have, that IS your “default route”. So when you see the asterisk, that means someone has written a static default route on that router and you’ll also see this : ‘Gateway of last resort is’ and then there’s the next hop IP address we put in, and it’s going to say ‘to network all zeros’.
Now when we think of the word “default” in computing, what do we think of? We think of the first thing! This is going to happen unless we change something. Default route sounds like the route that’s going to be used first (to some) , and the default static route really IS what it says right here ( the gateway of last resort ). It’s the last resort route.
So basically when you have a default route in the table, the router is looking for a match. It’s looked through everything else. It says: “ok I don’t have a match for this route because there is no match in this table for 2.2.2.2” . there’s only one other entry anyway and 172.12.123.0 is definitely not a match for 2.2.2.2 . so then the router is going to say : “ ok I’ve got a default static route. I’ve got a gateway of last resort set. I’m going to send these packets to 172.12.123.2”.
So let’s send there a ping first from here:
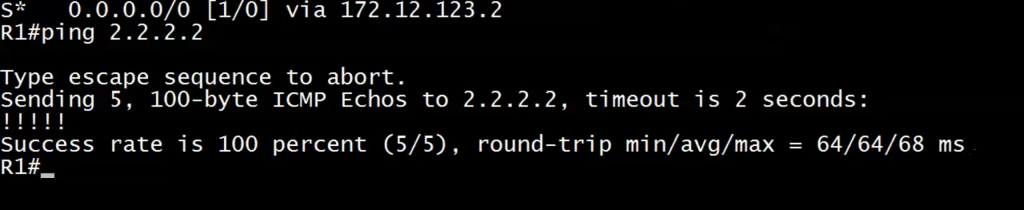
They went right through. No problem at all.
Let’s go back to R3 now after all of this and we’ve had some great lab work here. You got to see how the routing works in a couple of different uses of IP route.
When we’re on this situation now, we’ve written a host default route on R3 and a default static route on R1. Will this ping go through from R3?
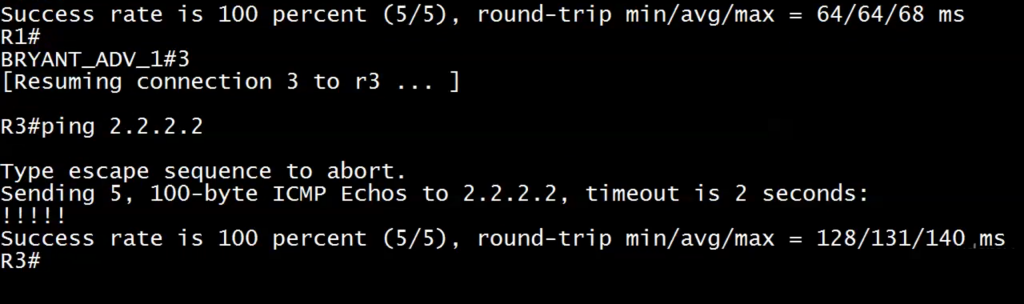
Yes… and you also notice again the round trip time is more when R3 ping that address ( rather that R1 in the previous picture) because the traffic from spoke to spoke has to go through the hub.
Default Routes Are Beautiful (Sometimes)
We know that the router is going to parse the routing table. It’s going to look through the entire routing table for the best match for a packet that it needs to route. And the thing is with smaller IP tables ( six or seven routes) it might not matter. But in some production network you might see routers that the IP routing table is two or three screen.
We want our router to be able to successfully route packets and at the same time we want to keep our routing tables complete and concise. We want to shrink it down a little bit whenever possible because it does make the overall routing process much more efficient. The default routes can really help us accomplish that goal, and they’re so helpful under certain circumstances that our dynamic routing protocols (rip, EIGRP, OSPF) will either allow the creation of a default route or the distribution of a default route under certain circumstances rather than give a router a full routing table.
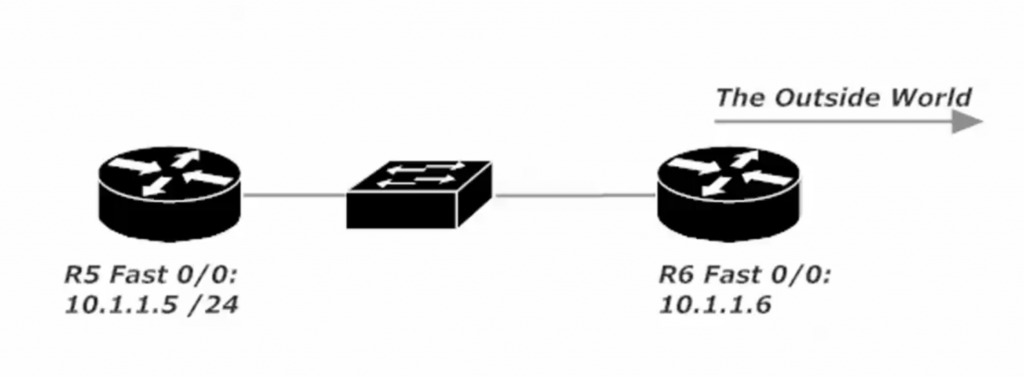
Let’s say that router 5 is so deep in your network that no matter where it’s sending packets to (whether it’s an internal network or whether it’s going outside your local network) the next hop IP address is always going to be 10.1.1.6 . Whatever packets router 5 has to send through, it’s going to go to a 10.1.1.6 no matter what.
In this case it really wouldn’t make sense for R5 to have a huge routing table, because whatever it does with that look up, the next stop IP address would be 10.1.1.6.
So it would be in our best interests and the best interests of routing on R5 in particular to give R5 a default route and just say: “OK any packets you’re sending, send it to 10.1.1.6 .
and you might not even want to run around in protocol on R5 at all! You might just want to give it that one default route and then that’s it.
So that of course begs the question if static routes are so great especially default static routes, why use dynamic routing protocols at all? Why don’t we just have static routes on every router and that’s that?
The answer is a term that we come back to a lot in networking and that is lack of scalability because as a world-class network admin we have to assume our network is going to grow.
Change is constant in our network, as is growth, and for that growth to happen successfully we have to plan for it.
Static routing can be really fine in a pinch and it can be really fine for small networking , but it’s not friendly to a growing network. In most of today’s network, it’s much more efficient to use a routing protocol like EIGRP, OSPF, or RIPv2 to keep our routing tables complete and concise.
And speaking of routing protocols…
To be continued…